Craving crispy tacos without the messy frying? These mini baked chicken tacos come together in just 20 minutes using simple ingredients. Perfect for busy weeknights, game day appetizers, or meal prep lunches, this recipe delivers maximum flavor with minimal effort. Let’s dive into how to create these crowd-pleasing handheld delights.

Why You’ll Love These Mini Baked Chicken Tacos
Several features make this recipe a standout choice for taco lovers. First, baking eliminates the need for oil splatters while still achieving satisfying crunch. Second, the two-step folding method ensures perfect taco shapes without breaking tortillas. Finally, the combination of seasoned chicken and melted cheese creates irresistible flavor pockets that please kids and adults alike.
Family Friendly Meals
Even picky eaters enjoy these mini tacos because the flavors stay approachable. The small size makes them easy for little hands to hold, while adults can customize toppings to their preference. Consider making a double batch since leftovers reheat beautifully for quick lunches.
Minimal Cleanup Required
Using just one or two baking sheets keeps kitchen messes under control. Unlike traditional frying methods, you won’t need to deal with greasy stovetops or multiple pans. Parchment-lined sheets make cleanup even simpler – just toss the paper when done.
Recipe
Print
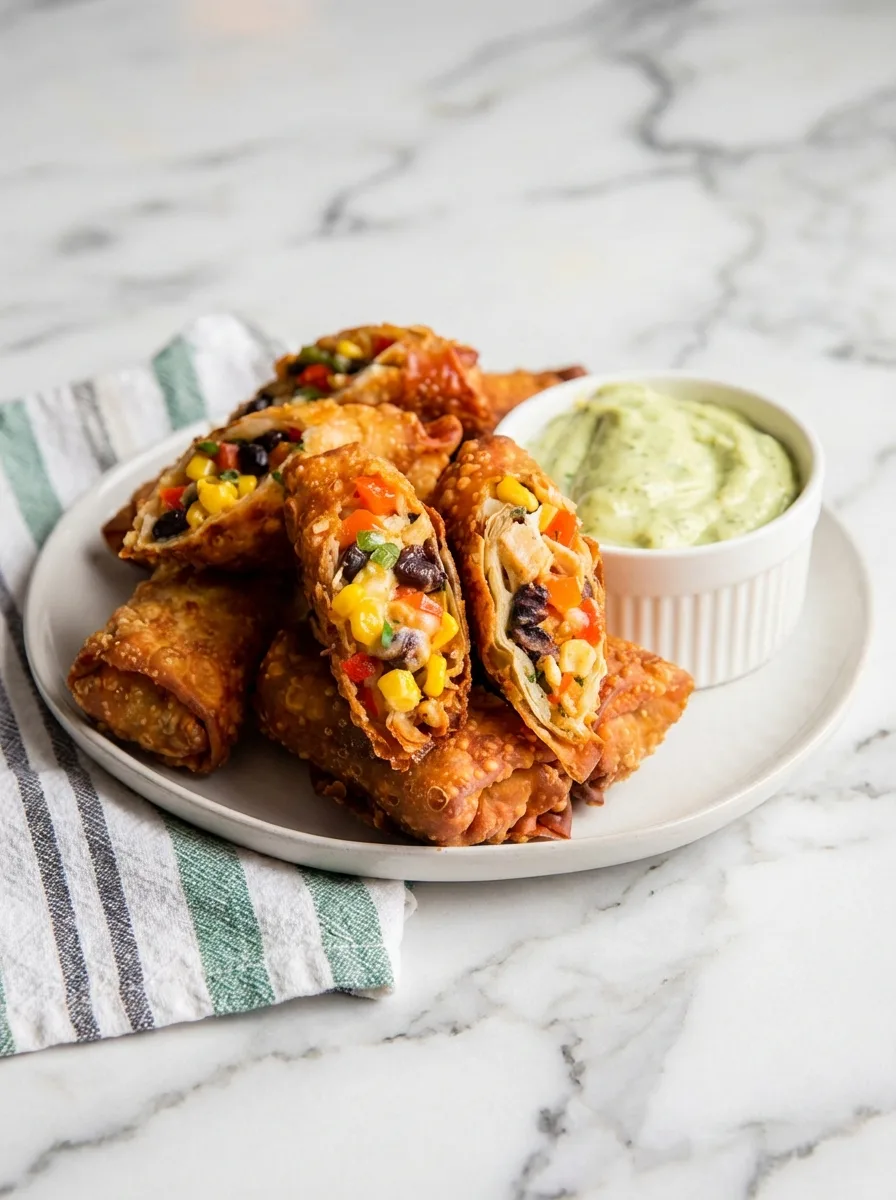
20 Minute Mini Baked Chicken Tacos
- Total Time: 20 min
- Yield: 20 servings 1x
Description
Crispy mini tacos filled with seasoned chicken and melted cheese, ready in 20 minutes
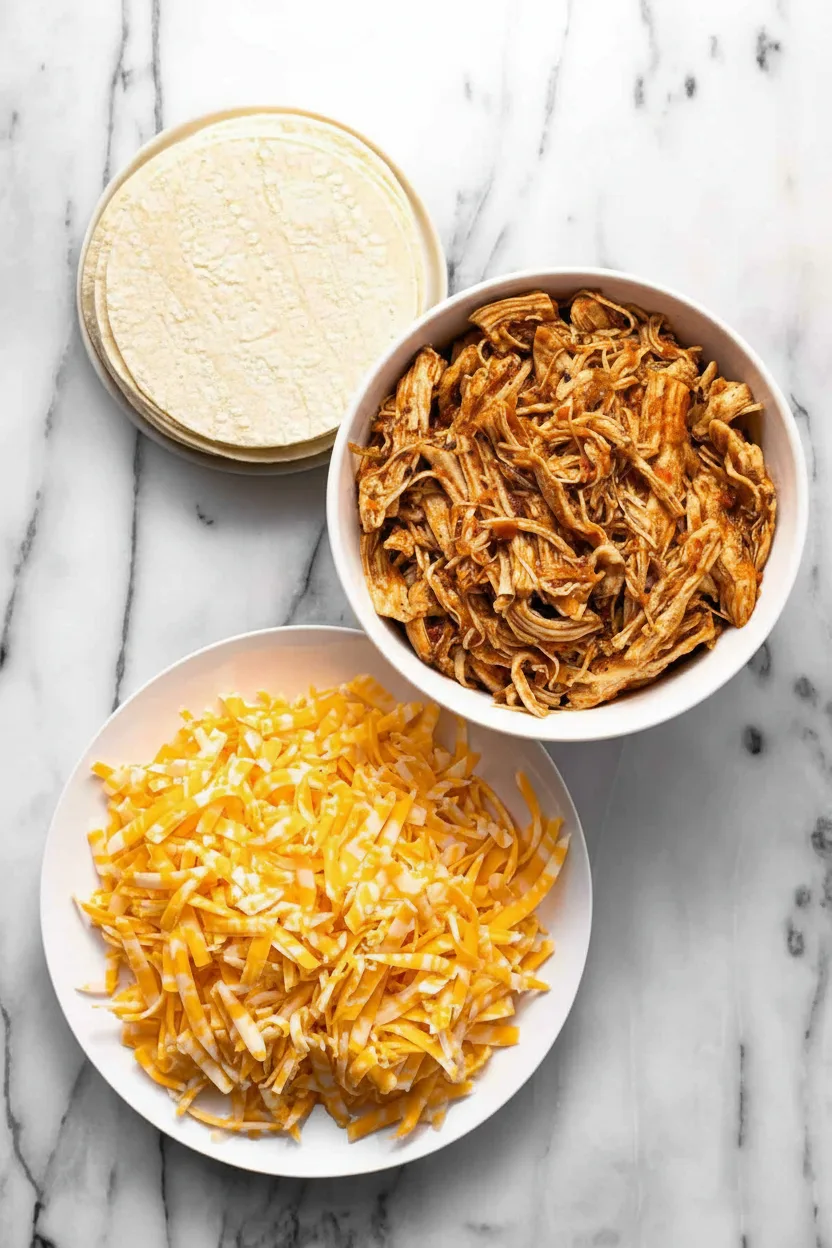
Ingredients
- 1 lb cooked shredded seasoned chicken breast (453 g)
- 8 oz shredded colby jack cheese (226 g)
- 20–24 street taco corn tortillas
- Olive oil or cooking spray
- Sour cream for serving
- Salsa for serving
- Fresh chopped cilantro for serving
Instructions
- Heat oven to 425°F (220°C).
- Place tortillas on baking sheet and brush/spray both sides with oil.
- Add heaping tablespoon chicken and cheese to each tortilla.
- Bake 2 minutes until cheese melts. Remove from oven.
- Carefully fold each tortilla in half, pressing gently into taco shape.
- Bake 12-15 minutes until tortillas become crispy.
- Serve with sour cream, salsa, and cilantro.
Notes
- For meal prep: Store unbaked assembled tacos in freezer
- Make vegetarian version using black beans instead of chicken
- Use store-bought rotisserie chicken for faster prep
- Prep Time: 5 min
- Cook Time: 15 min
- Category: Main Course
- Method: Baked
- Cuisine: American
Nutrition
- Calories: 101 calories
- Sugar: 0.5 g
- Sodium: 131.6 mg
- Fat: 4.8 g
- Carbohydrates: 7.3 g
- Fiber: 1.1 g
- Protein: 7.5 g
Ingredients and Substitutions
These tacos shine with their simplicity, but several ingredient swaps can accommodate different dietary needs. Here’s the essential lineup:
Base Components
- Cooked shredded chicken breast (1 lb / 453 g): Use rotisserie chicken for ultimate convenience
- Colby jack cheese (8 oz / 226 g): Monterey Jack or pepper jack work well
- Street taco corn tortillas (20-24 count): Whole wheat or almond flour tortillas for low-carb option
Optional Toppings
- Sour cream: Greek yogurt makes a protein-rich alternative
- Salsa: Try pico de gallo for fresher flavor or smoky chipotle sauce
- Fresh cilantro: Omit if you dislike this herb or substitute parsley
For vegetarian versions, replace chicken with seasoned black beans or roasted vegetables. Consider pairing these tacos with a warming chicken and poblano soup for a complete meal.
How to Make Mini Baked Chicken Tacos
Follow these straightforward steps to create perfectly crisp tacos every time. Preheating your oven ensures even cooking and optimal texture development.
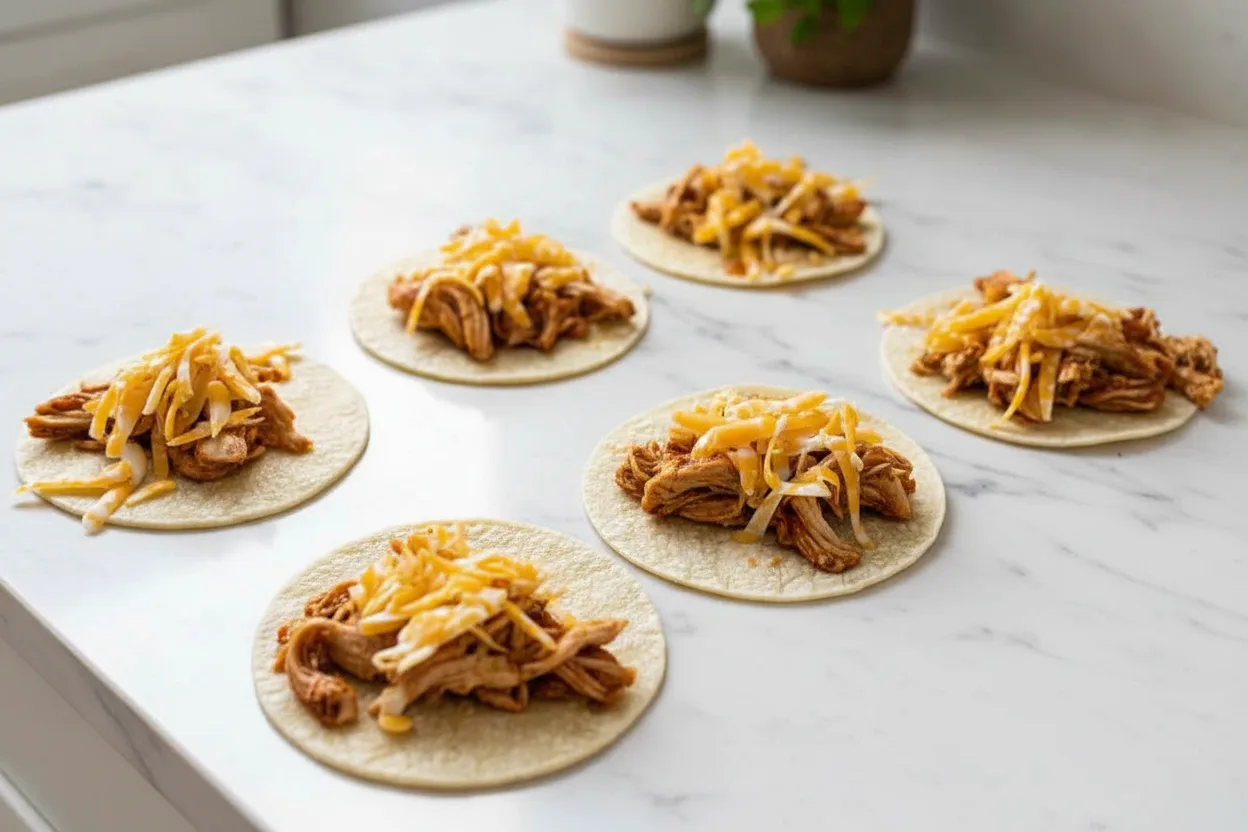
Step 1: Prepare Tortillas
Set oven temperature to 425°F (220°C). Arrange tortillas in a single layer on parchment-lined baking sheets. Lightly brush or spray both sides with oil to help them crisp during baking. Overcrowding prevents proper browning, so use additional sheets if needed.
Step 2: Add Fillings
Place heaping tablespoons of shredded chicken on each tortilla, leaving space around the edges. Top chicken with equal amounts of shredded cheese. Distribute fillings evenly to prevent uneven cooking and ensure every bite delivers balanced flavor.
Step 3: Shape and Bake
Bake uncovered for 2 minutes until cheese starts melting. Working quickly while warm but not hot, fold each tortilla in half pressing edges gently to maintain shape. Return to oven and bake 12-15 minutes until golden and crisp. Stand nearby during last 5 minutes to prevent burning.
Pro Tips for Success
Apply these expert techniques to elevate your taco game. Small adjustments make noticeable differences in final texture and flavor.
- Warm tortillas briefly before assembling to increase flexibility
- Pat chicken dry with paper towels to prevent sogginess
- Open oven minimally during baking to maintain steady heat
- Rotate pans halfway through baking for even browning
Flavor Variations
Customize these tacos to suit your taste preferences or use leftover ingredients. The basic recipe works beautifully with numerous add-ins and seasoning adjustments.
Protein Swaps
Replace chicken with turkey, beef, or tofu crumbles. For seafood lovers, finely chopped shrimp seasoned with lime zest makes an excellent alternative. Prep cooked proteins ahead for even faster assembly later.
Cheese Choices
Experiment with different melting cheeses like Oaxaca, Chihuahua, or smoked gouda. Dairy-free options work well too – look for plant-based shreds designed to melt smoothly.
Complement your tacos with a comforting bowl of creamy vegetable soup featuring seasonal produce.
Serving Suggestions
Presentation matters when serving these golden beauties. Arrange them standing upright on platters with dipping sauces on the side. Add colorful garnishes to make the spread visually appealing.
Accompaniments
- Avocado lime crema: Blend avocado with sour cream and lime juice
- Pickled onions: Quick-pickle red onions for tangy contrast
- Jalapeño slices: Offer fresh or pickled for heat lovers
Meal Pairings
Balance the tacos with lighter sides like citrus salad or cucumber sticks. Heartier appetites appreciate additions like Mexican rice or charro beans. For cozy dinner combos, try them with Italian pastina soup featuring tiny pasta stars in savory broth.
Storage and Freezing Instructions
Proper storage maintains texture and flavor for days. Follow these guidelines for best results with leftovers.
Refrigeration Methods
Cool tacos completely before transferring to airtight containers. Separate layers with parchment paper to prevent sticking. Store refrigerated up to 4 days. Reheat in oven or air fryer at 375°F (190°C) for 5-7 minutes to restore crispness.
Freezing Techniques
Flash freeze unbaked assembled tacos on baking sheets until solid, then transfer to freezer bags. Bake directly from frozen adding 3-5 minutes to cooking time. Pre-baked tacos freeze well too – thaw before reheating for even warming.
Nutrition Facts per Serving
| Calories | Fat | Carbs | Protein | Fiber | Sugar | Sodium |
|---|---|---|---|---|---|---|
| 101 | 4.8 g | 7.3 g | 7.5 g | 1.1 g | 0.5 g | 131.6 mg |
FAQs About Mini Baked Chicken Tacos
Can I use flour tortillas instead?
Yes, flour tortillas work well but may become softer than corn versions. Reduce baking time by 2 minutes since flour browns faster. Choose taco-sized tortillas to maintain easy folding capacity.
How do I prevent tortillas cracking?
Proper oiling and careful folding prevent most cracking issues. Brush oil thoroughly across the entire surface, including edges. Fold while still warm after initial baking so they become pliable without tearing.
What seasonings work best for chicken?
Use classic taco seasoning or create your own blend with chili powder, cumin, garlic powder, and paprika. For extra zest, stir lime juice into shredded chicken before assembling.
Final Thoughts
These mini baked chicken tacos prove weeknight dinners can be both speedy and spectacular. With their satisfying crunch and gooey cheese center, they’ll become your new favorite solution for hungry families. Experiment with different fillings and toppings to keep meals exciting throughout the month. Next time hunger strikes, remember this recipe transforms simple ingredients into extraordinary meals faster than takeout arrives. Happy baking.