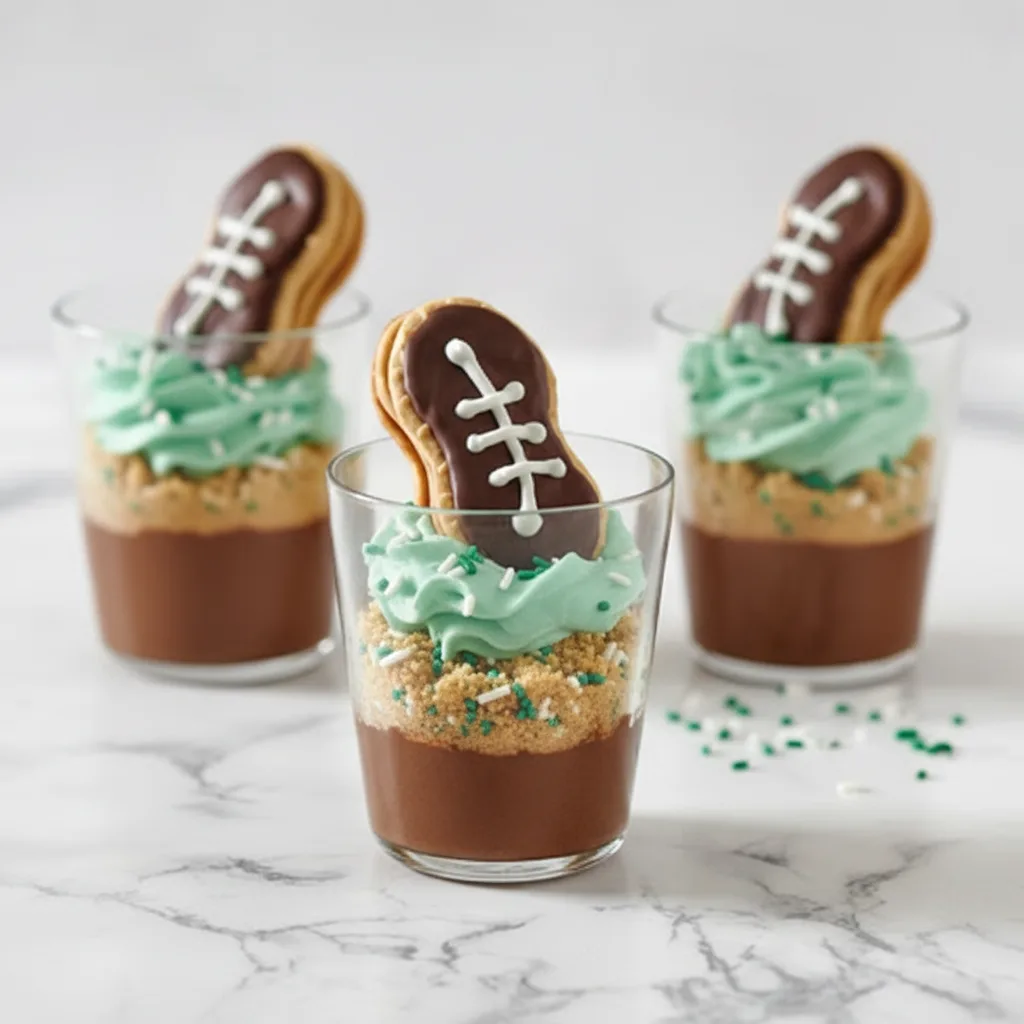
Looking for a fun dessert that brings the ballpark home? Look no further than these adorable and easy-to-make baseball dirt cups. These no-bake treats combine creamy chocolate pudding, light whipped topping, and crushed cookies to create a delicious “dirt” filling.
With a few clever decorations, you can turn simple ingredients into playful baseball-themed masterpieces. This dessert is perfect for parties, playdates, or a special family treat after a great game. With a simple list of ingredients and straightforward steps, you will have a winning dessert in no time.
Why You’ll Love This Baseball Dirt Cups Recipe
You will love this recipe for many reasons. First, the process is incredibly easy. You do not need to turn on your oven at all. Second, the result is a fantastic make-ahead dessert that always impresses a crowd. Kids absolutely adore these cups because they look like fun. Meanwhile, adults appreciate the nostalgic flavors and light texture.
Furthermore, you can customize the colors and decorations to fit any team or theme. Finally, this recipe uses mostly pantry staples, making it convenient and affordable. The combination of chocolate, peanut butter cookies, and sweet whipped cream creates a perfect flavor balance. It is a home run every single time.
Recipe
Print
Baseball Dirt Cups
- Total Time: 20 min
- Yield: 8 servings 1x
Description
Fun, no-bake baseball-themed dessert cups with chocolate pudding, crushed cookies, and whipped topping.
Ingredients
- 16 peanut-shaped cookies, divided
- 2 oz. semi-sweet baking chocolate, melted (about 57 g)
- 2 Tbsp. white decorating icing (about 30 ml)
- 1 pkg. chocolate fudge instant pudding mix
- 2 cups milk (475 ml)
- ¼ cup multi-colored sprinkles, divided (about 40 g)
- 1 cup frozen whipped topping, divided (about 240 ml)
- 6 drops food coloring (any color)
Instructions
- Set aside 8 cookies. Dip one side of each in melted chocolate. Place on parchment paper and pipe white icing stitches to look like baseballs. Let set.
- Crush the remaining 8 cookies into fine crumbs in a zip-top bag.
- In a large bowl, whisk pudding mix with cold milk for 2 minutes until thickened.
- Fold half of the sprinkles and half of the crushed cookie crumbs into the pudding.
- Gently fold in 1 cup of whipped topping until no white streaks remain.
- In a separate bowl, mix remaining ½ cup whipped topping with 6 drops food coloring (optional).
- Spoon layers of pudding mixture, remaining crumbs, and sprinkles into 8 clear cups.
- Top each cup with a dollop of plain or colored whipped topping.
- Press one decorated cookie “baseball” into the topping of each cup. Serve immediately or chill.
Notes
- Use cold milk for best pudding consistency.
- Assemble just before serving for the crunchiest cookie layers.
- Clear cups show off the fun ‘dirt’ layers best.
- Prep Time: 20 min
- Category: Main Course
- Method: Baked
- Cuisine: American
Nutrition
- Calories: 310 Calories
- Sodium: 330mg Sodium
- Protein: 5g Protein
Ingredients and Substitutions
Gathering your ingredients is the first step to success. Each component plays a specific role in creating the perfect texture and flavor.
Base Components
You need a package of chocolate fudge instant pudding mix. This forms the rich, chocolatey base of your “dirt.” Whole milk is best for a creamy consistency. Additionally, you will need a classic peanut-shaped cookie. These cookies create the wonderful “dirt” texture and add a fantastic peanut butter flavor. You also need frozen whipped topping to lighten the pudding and make it fluffy.
Decorations and Accents
For the fun baseball decorations, you need a little melted semi-sweet chocolate. White decorating icing helps you draw the classic baseball stitches. You can use colorful sprinkles to add a festive touch to your dirt layers. Food coloring is optional but allows you to tint your whipped topping for extra team spirit.
Helpful Substitutions
You can easily swap ingredients based on your needs. For a dairy-free option, use your favorite plant-based milk and dairy-free whipped topping. If you want a different cookie, chocolate wafer cookies or even regular chocolate sandwich cookies work well. Use any color of sprinkles you like. If you do not have decorating icing, a small amount of melted white chocolate works in a pinch.
How to Make Baseball Dirt Cups
Making these cups is a simple and enjoyable process. Let us walk through each step.
Step 1: Prepare Your Decorations
First, take eight of your peanut-shaped cookies and set them aside. These will become your baseballs. Melt your semi-sweet chocolate gently. Next, dip one side of each reserved cookie into the melted chocolate. Place them on a sheet of parchment paper. Immediately, use your white decorating icing to pipe the classic red baseball stitch pattern onto the chocolate. Let these decorated “baseballs” set completely while you make the filling.
Step 2: Make the Chocolate Dirt Filling
Take the remaining eight peanut-shaped cookies. Place them in a zip-top bag and crush them with a rolling pin. You want fine crumbs with a few small chunks for texture. In a large mixing bowl, whisk the chocolate fudge pudding mix with two cups of cold milk for two full minutes. The mixture will thicken nicely. Then, gently fold in half of your colored sprinkles and half of the crushed cookie crumbs. Reserve the other halves for later.
Step 3: Fold in the Whipped Topping
Now, gently fold one cup of frozen whipped topping into the thickened pudding mixture. Use a spatula and fold slowly until no white streaks remain. This step makes the filling light and airy. If you wish to color your whipped topping, add six drops of food coloring to the remaining half cup of whipped topping in a separate bowl and stir gently. You can then add spoonfuls of this colored cream to the top of your finished cups for a colorful touch.
Step 4: Assemble the Dirt Cups
Get out eight clear cups or small mason jars for serving. First, spoon a layer of the chocolate pudding mixture into the bottom of each cup. Sprinkle a layer of the reserved cookie crumbs and a pinch of sprinkles on top. Repeat the layers until the cups are nearly full, ending with a final dusting of crumbs. Top each cup with a dollop of plain or colored whipped topping.
Step 5: Final Garnish and Serve
Finally, take your fully set chocolate-dipped cookie baseballs. Carefully press one baseball into the whipped topping on each cup. You can add an extra sprinkle or two around the base for a final flourish. Your baseball dirt cups are ready to serve immediately, or you can chill them until you are ready.
Pro Tips for Success
Follow these simple tips for the best results every time. First, make sure your milk is cold. This helps the instant pudding set quickly and properly. Second, crush your cookies well, but do not turn them into a fine powder. You want some texture to mimic real dirt. Third, fold the whipped topping gently. Overmixing can deflate the mixture and make it dense. Fourth, let your chocolate-dipped cookies set completely on parchment paper. This prevents smearing. Finally, use clear cups. The fun layers are a big part of the appeal, so let everyone see them.
Flavor Variations
This recipe is wonderfully adaptable. You can try so many different twists. For a cookies and cream version, use chocolate sandwich cookies instead of the peanut-shaped ones. You can also use vanilla pudding and golden oreo crumbs for a “blonde dirt” effect. Add a layer of chocolate chips or mini marshmallows in the middle for extra fun. For a minty fresh take, add a few drops of mint extract to the pudding. The possibilities are almost endless, just like your creativity.
Serving Suggestions
These cups are a fantastic stand-alone dessert. However, you can easily build a whole theme around them. Serve them alongside other ballpark favorites like soft pretzels and popcorn. For a full meal, consider pairing them with a savory main course. For instance, these cups would be a delightful finish to a dinner featuring our hearty beef steak fajita bowls. The sweet dessert balances the bold, savory flavors perfectly. They also make a great after-game treat for a hungry team.
Storage and Freezing Instructions
You can store assembled dirt cups in the refrigerator, covered, for up to two days. The cookie crumbs will soften over time, but they will still taste delicious. For longer storage, it is best to keep the components separate.
Store the pudding mixture, crushed cookies, and whipped topping in airtight containers in the fridge. Then, assemble the cups just before serving. I do not recommend freezing the fully assembled cups, as the texture of the whipped topping and pudding can become grainy upon thawing.
FAQs About Baseball Dirt Cups
Can I make these ahead of time?
You can absolutely make these ahead of time. Prepare the pudding mixture and store it in the fridge for up to one day. Keep the crushed cookies and whipped topping separate. Assemble the layers in the cups just a few hours before serving for the best texture.
Can I use a different pudding flavor?
Yes, you can use a different pudding flavor. However, chocolate or chocolate fudge works best for the classic “dirt” look. If you use vanilla or butterscotch, you might want to call them “sand cups” instead for a fun beach theme.
What if I don’t have clear cups?
If you do not have clear cups, you can use any small bowl or ramekin. The layered effect will be hidden, but the taste will be just as wonderful. You can also make one large trifle in a clear bowl for a big crowd-pleaser.
How can I make this nut-free?
To make this dessert nut-free, simply use a nut-free cookie. Chocolate wafer cookies or a nut-free sandwich cookie are perfect alternatives. Always check the labels to ensure they are safe for your needs.
Are these cups kid-friendly to assemble?
These cups are very kid-friendly to assemble. Children love crushing the cookies, layering the ingredients, and decorating the tops. It is a fantastic activity for a rainy day or a party. Just supervise any steps involving melted chocolate.
What main dish goes well with this dessert?
This dessert pairs well with many main dishes. Its sweet, creamy profile is a great ending to a lighter meal. For example, try it after our elegant Caprese stuffed chicken for a lovely contrast. Alternatively, after a rich pasta like our zucchini noodle chicken alfredo, this light dessert is a perfect palate cleanser.
Final Thoughts
Baseball dirt cups are more than just a dessert. They are a fun, creative, and delicious experience. This recipe proves that you do not need complicated techniques to create something special. With simple layers and clever decorations, you bring a smile to everyone’s face.
The creamy chocolate pudding, the crunchy cookie dirt, and the sweet whipped topping create a combination that everyone loves. Whether you are hosting a World Series party or just want a fun weeknight treat, these cups are a guaranteed winner. Grab your ingredients and get ready to play ball in the kitchen. Your family and friends will cheer for these delightful treats.