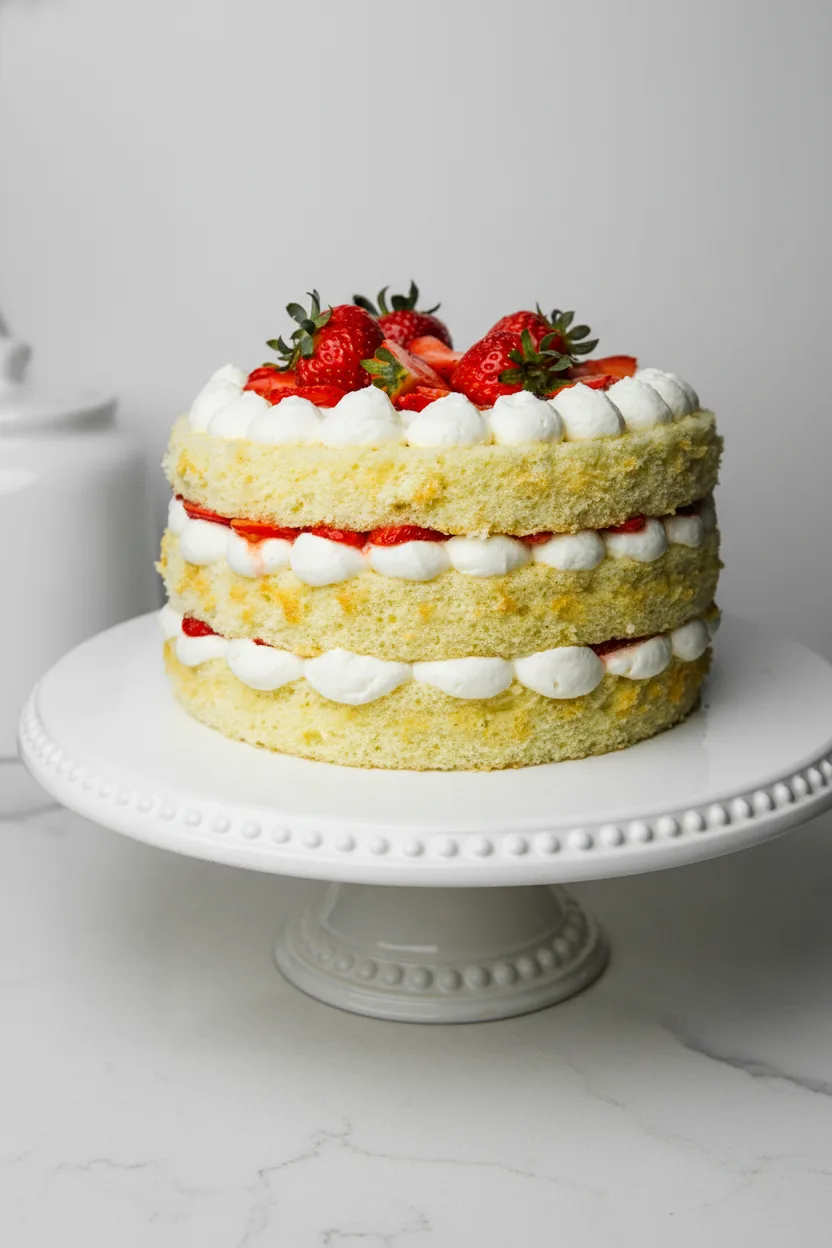
Looking for a stunning dessert that combines airy sponge cake, fresh strawberries, and fluffy whipped cream? This Strawberry Shortcake Layer Cake delivers classic flavors in an elegant package.
Unlike heavier butter cakes, this dessert keeps things light with a tender European-style sponge that showcases summer berries perfectly. Follow our simple steps to create this crowd-pleasing masterpiece for birthdays, parties, or anytime celebration.
Why You’ll Love This Strawberry Shortcake Layer Cake
This recipe checks all the boxes for dessert perfection. The sponge cake base bakes up beautifully golden with a delicate crumb that melts in your mouth.
Meanwhile, fresh strawberries add natural sweetness while the whipped cream frosting keeps everything refreshingly light. Best of all, you’ll love the simplicity of preparation since this cake relies on fundamental techniques without complicated steps.
Perfect Balance of Flavors
Every bite balances tart strawberries with sweet cream and neutral sponge cake. Unlike overly sugary desserts, this treat lets natural fruit flavors shine through. Additionally, the European sponge provides the ideal texture foundation without competing with other components.
Versatile Occasion Dessert
Whether serving at backyard barbecues or formal gatherings, this cake impresses guests with its beautiful layers and fresh ingredients. For an easy variation on classic strawberry shortcake ideas, try pairing slices with a summer bean salad to balance your meal.
Recipe
Print
Strawberry Shortcake Layer Cake (Sponge Cake)
- Total Time: 1 hour
- Yield: 8 servings 1x
Description
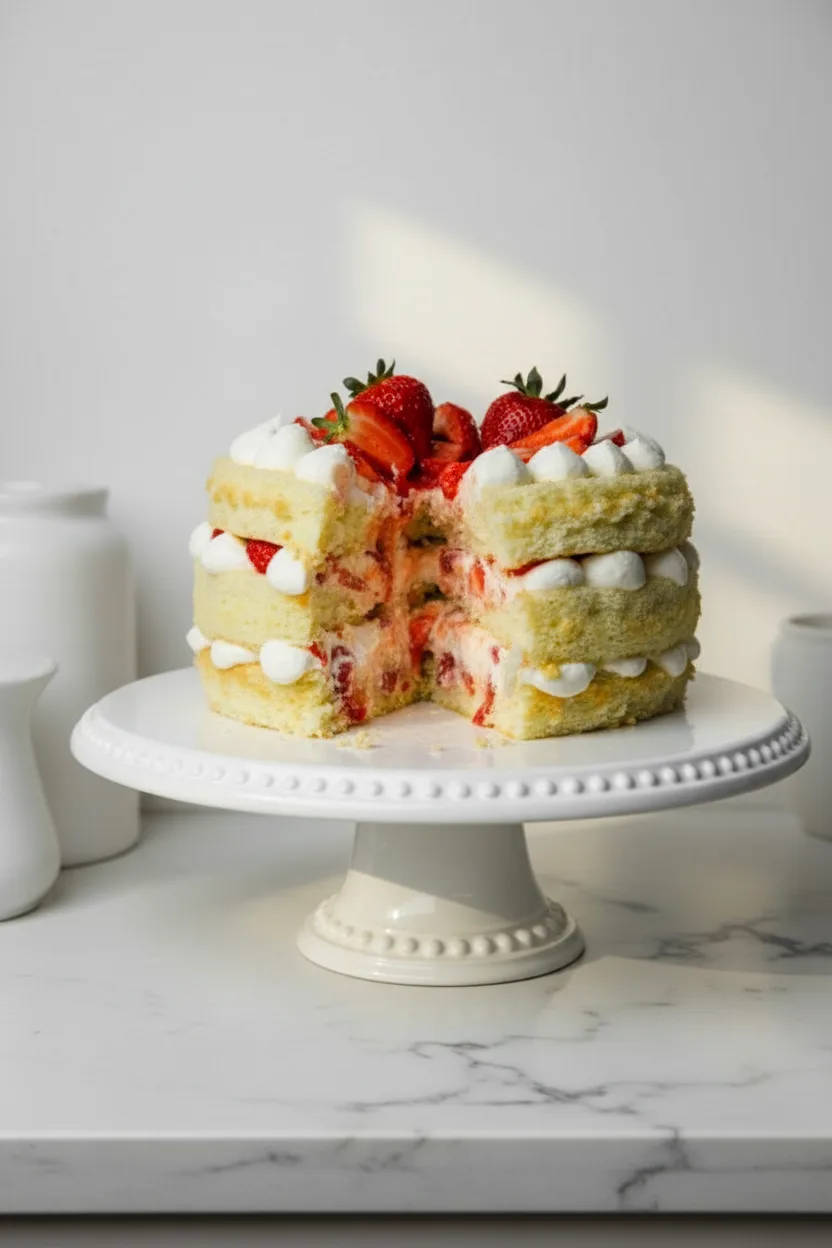
Layers of light sponge cake, fresh strawberries, and whipped cream create this classic dessert perfect for celebrations.
Ingredients
- 6 large eggs (room temperature)
- 6 tbsp water (room temperature)
- 1.5 cup granulated sugar (300 g)
- 1 cup all-purpose flour (120 g)
- ½ cup cornstarch (60 g)
- pinch of salt
- 2.5 cups heavy cream (600 ml)
- 1 cup powdered sugar (120 g)
- 2 tsp vanilla extract
- 1.5 lbs fresh strawberries (680 g), hulled and sliced
Instructions
- Preheat oven to 350°F (175°C). Line three 8-inch round cake pans with parchment paper.
- In large bowl, beat eggs and water on high 2 minutes until frothy. Gradually add sugar while beating 5 more minutes until thick and pale.
- Sift together flour, cornstarch and salt. Gently fold dry ingredients into egg mixture in three additions.
- Divide batter evenly among pans. Bake 25-30 minutes until tops spring back. Cool completely in pans.
- Chill mixing bowl and beaters 15 minutes. Beat cold heavy cream to soft peaks.
- Add powdered sugar and vanilla. Beat to stiff peaks. Refrigerate until assembly.
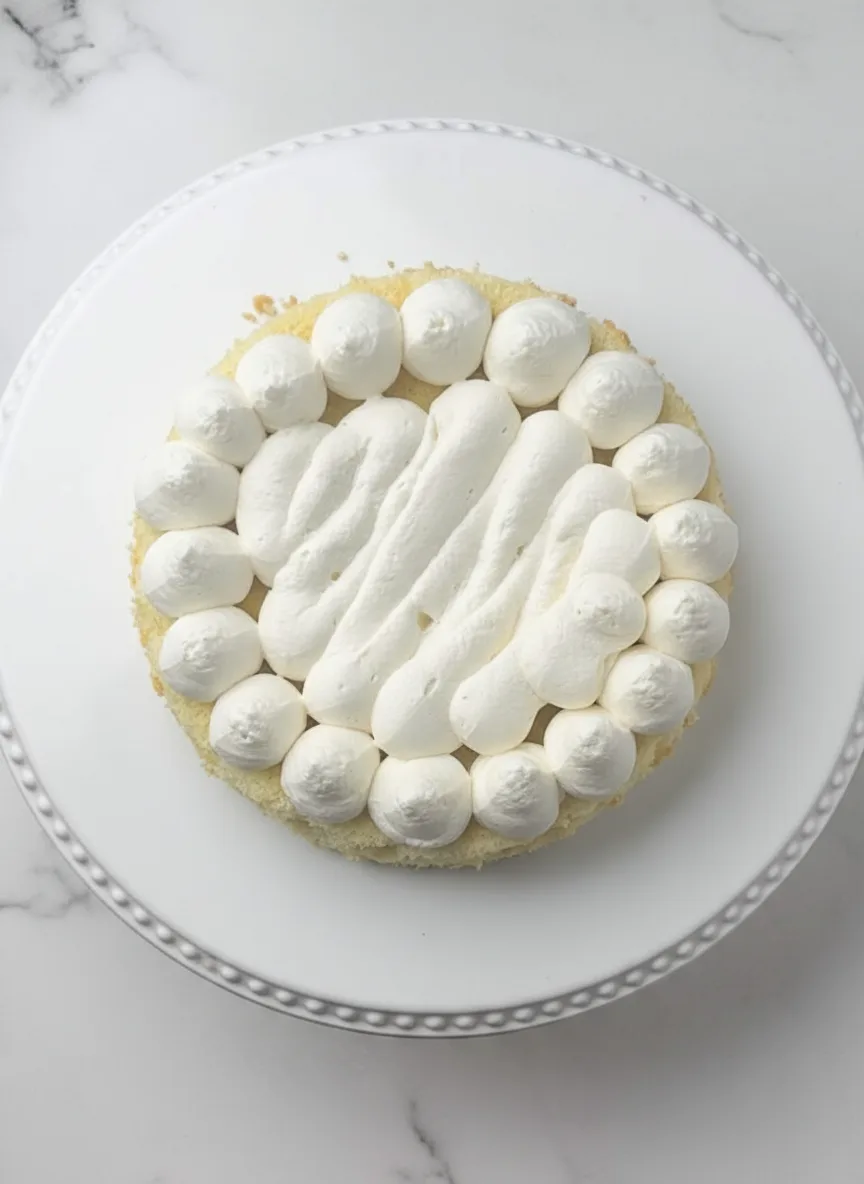
- Place first cake layer on plate. Spread ¾ cup whipped cream over surface.
- Arrange strawberry slices over cream. Top with second cake layer and repeat.
- Add final cake layer. Frost top and sides with remaining whipped cream.
- Decorate with remaining strawberry slices. Refrigerate until serving.
Notes
- Room temperature eggs create better sponge cake structure
- Slice strawberries uniformly for even layers
- Chill cake layers before assembly for cleaner cutting
- Prep Time: 30 min
- Cook Time: 30 min
- Category: Main Course
- Method: Baked
- Cuisine: American
Ingredients and Substitutions
This recipe uses basic pantry staples transformed into something extraordinary. For best results, use room temperature eggs and heavy cream straight from the refrigerator.
Base Components
- 6 large eggs (room temperature)
- 6 tablespoons water (room temperature)
- 1.5 cups granulated sugar (300 g)
- 1 cup all-purpose flour (120 g)
- ½ cup cornstarch (60 g)
- Pinch of salt
Filling and Topping
- 2.5 cups heavy cream (600 ml)
- 1 cup powdered sugar (120 g)
- 2 teaspoons vanilla extract
- 1.5 pounds fresh strawberries (680 g), hulled and sliced
How to Make Strawberry Shortcake Layer Cake
Follow these straightforward steps for perfect results every time. The process breaks down into cake preparation, whipped cream making, and artistic assembly.
Step 1: Prepare the Sponge Cake
Preheat oven to 350°F (175°C). Line three 8-inch round cake pans with parchment paper. In a large bowl, beat eggs and water on high speed for 2 minutes until frothy. Gradually add granulated sugar while beating another 5 minutes until thick and pale.
Sift together flour, cornstarch, and salt. Gently fold dry ingredients into egg mixture in three additions until just combined. Divide batter evenly among prepared pans. Bake 25-30 minutes until tops spring back when lightly pressed. Cool completely in pans.
Step 2: Make Whipped Cream
Chill mixing bowl and beaters for 15 minutes. Pour cold heavy cream into bowl. Beat on medium speed until soft peaks form. Add powdered sugar and vanilla extract. Increase speed to high and beat until stiff peaks form. Refrigerate until assembly.
Step 3: Assemble Layers
Place first cake layer on serving plate. Spread ¾ cup whipped cream over surface. Arrange single layer of strawberry slices over cream. Top with second cake layer and repeat. Add final cake layer. Frost top and sides with remaining whipped cream. Decorate with remaining strawberry slices. For a savory counterpoint to this sweet dessert, consider serving mini baked tacos as appetizers beforehand.
Pro Tips for Success
Apply these professional techniques to elevate your cake from good to extraordinary. Small adjustments make significant differences in texture and presentation.
- Use cake strips around pans for perfectly flat layers
- Chill cake layers before assembly to reduce crumbling
- Pat strawberry slices dry to prevent soggy layers
- Rotate pans halfway through baking for even browning
Flavor Variations
While this recipe shines in its classic form, creative bakers can experiment with delicious twists. Try these adaptations for seasonal inspiration.
Berry Medley Version
Combine sliced strawberries with blueberries and raspberries for colorful layers. The mixed berries create exciting flavor contrasts while using similar preparation methods. For another fruited dessert, check out these protein energy balls with pumpkin flavors.
Lemon Infused Cake
Add 2 tablespoons lemon zest to batter for citrusy undertones. Pair with lemon curd between layers for extra zing. The acidity beautifully complements both berries and cream.
Serving Suggestions
This versatile dessert works beautifully as standalone showstopper or part of larger menu offerings. Consider these presentation ideas and pairings.
- Garnish with mint sprigs for vibrant color contrast
- Drizzle with strawberry sauce for extra fruit flavor
- Serve with sparkling lemonade or iced tea
- Offer alongside vanilla bean ice cream
Storage and Freezing Instructions
Proper storage maintains freshness and food safety for this delicate dessert. Follow these guidelines for best results.
Refrigeration
Store assembled cake covered in refrigerator up to 3 days. Place toothpicks in top before covering to prevent plastic wrap from sticking to frosting.
Freezing Components
Freeze unfrosted cake layers wrapped tightly in plastic up to 2 months. Thaw at room temperature before assembling. Whipped cream and fresh strawberries should not be frozen
FAQs About Strawberry Shortcake Layer Cake
Can I make this cake ahead of time?
Yes, up to 24 hours in advance if stored properly. Assemble the cake and refrigerate until serving. Add fresh berry decorations within 2 hours of serving.
What’s the difference between shortcake and sponge cake?
Traditional strawberry shortcake uses biscuit-like cakes while this version features lighter sponge cake. Sponge cake absorbs fruit juices better while maintaining delicate texture.
How thick should I slice strawberries?
Slice berries ¼-inch thick for perfect layering. Thinner slices may become mushy while thicker pieces make uneven layers that cause sliding.
Final Thoughts
This Strawberry Shortcake Layer Cake proves that simple ingredients create extraordinary desserts when handled with care. The airy sponge layers provide the perfect canvas for sweet berries and pillowy whipped cream.
Whether celebrating special occasions or brightening ordinary days, this recipe delivers timeless flavors with elegant visual appeal.
With our clear instructions and expert tips, even novice bakers can achieve bakery-quality results in home kitchens. Remember that successful baking depends on precision with measurements and patience during each step. Happy baking!